
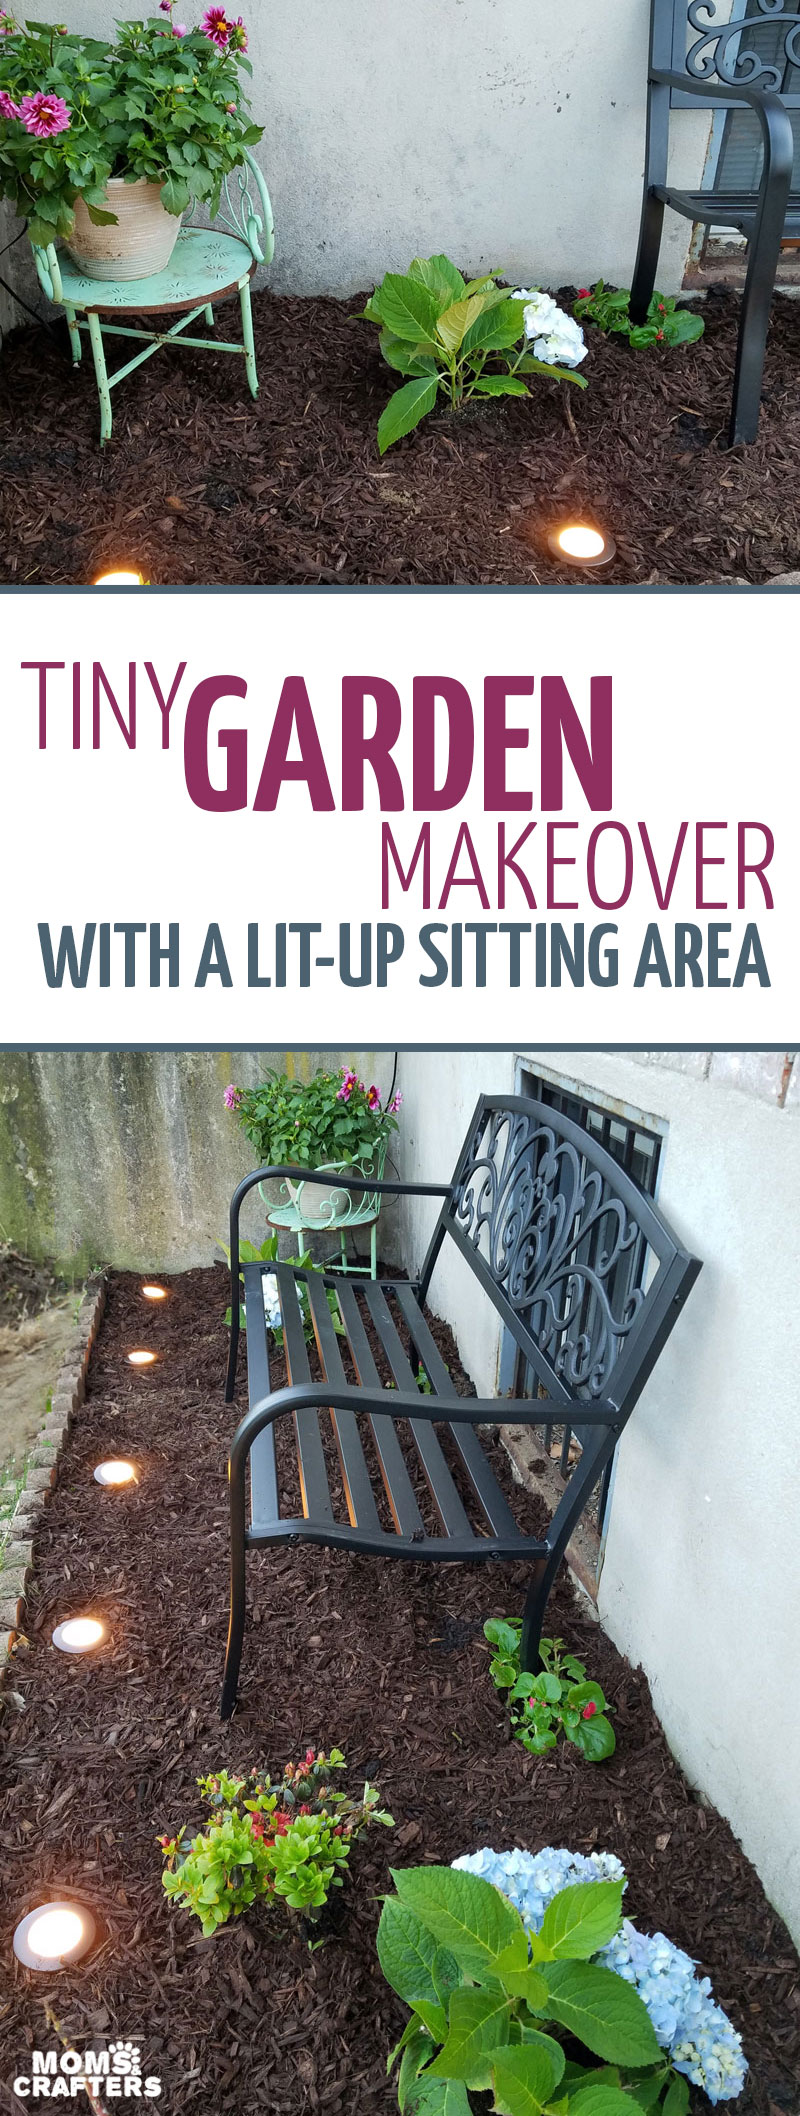
Small Garden Makeover – with a sweet sitting nook!
This post is sponsored by Jasco Products. All thoughts and opinions are my own.
Our small garden makeover is complete and I’m so excited to share with you what we’ve done! I’m thrilled to be partnering with Jasco Products with the launch of their NEW Jasco Enbrighten LED Color Changing Landscape Lights, available online and at Sam’s Club.
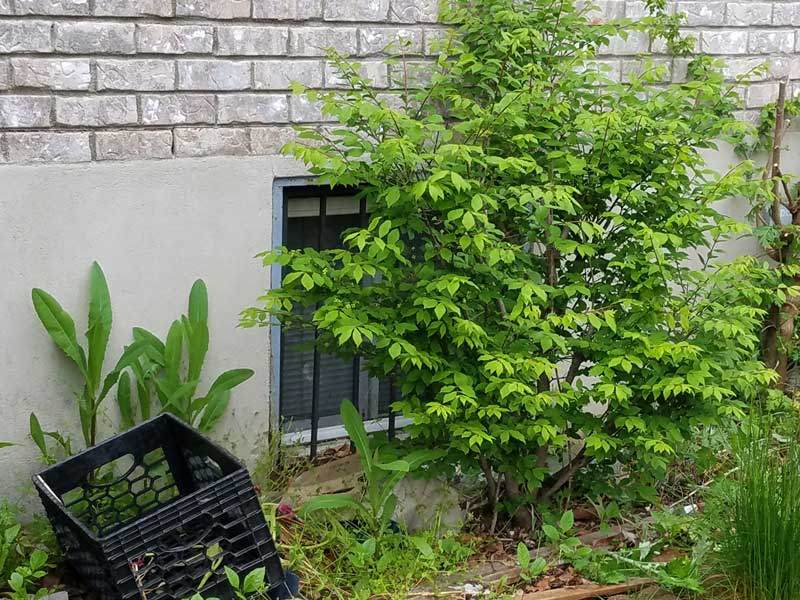
When we purchased our house a couple of years ago, we knew that it was desperately in need of some TLC. It’s the eyesore of the block, and the lawn, just like the rest of the house, came “as is” – complete with a huge tangle of weeds and invasive shrubs.
But Baby Y had just been born, and family was visiting. So it waited. The next year, more life circumstances prevented us from tackling home projects.
Finally, this year we are working on making over our outdoor spaces. We started with the little garden out front.
Here’s how it looked before:
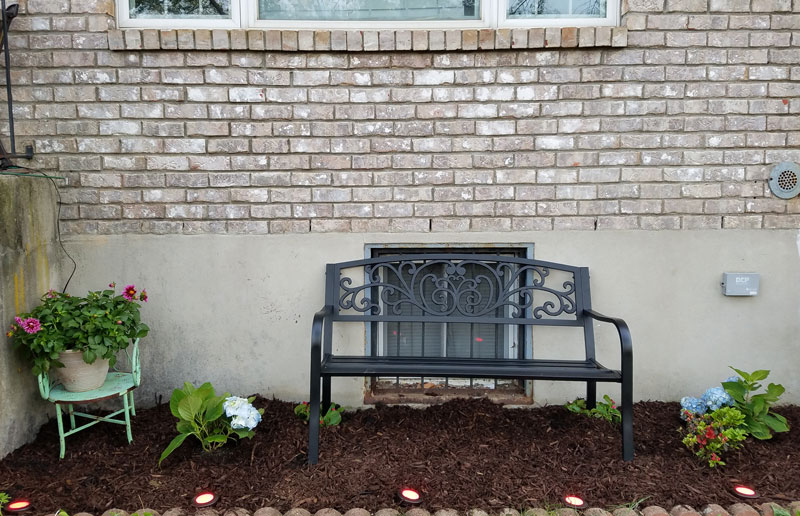
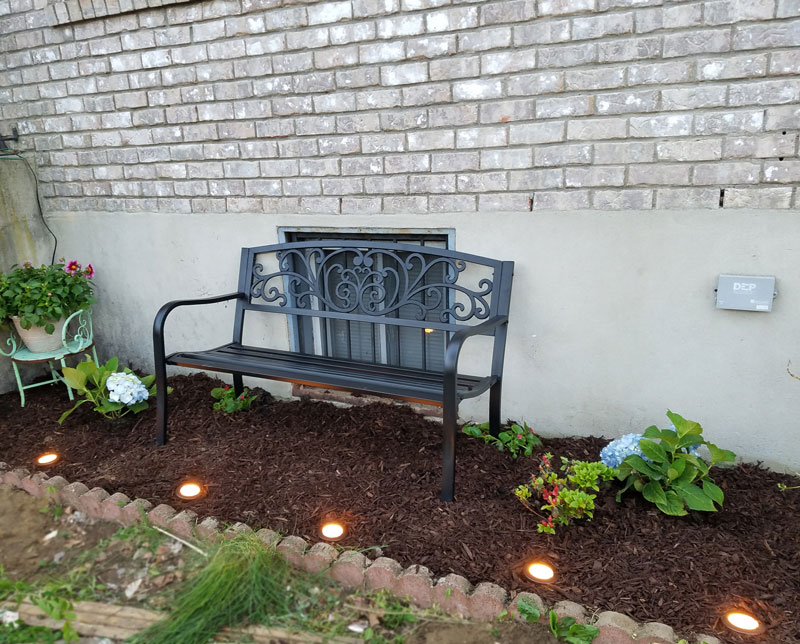
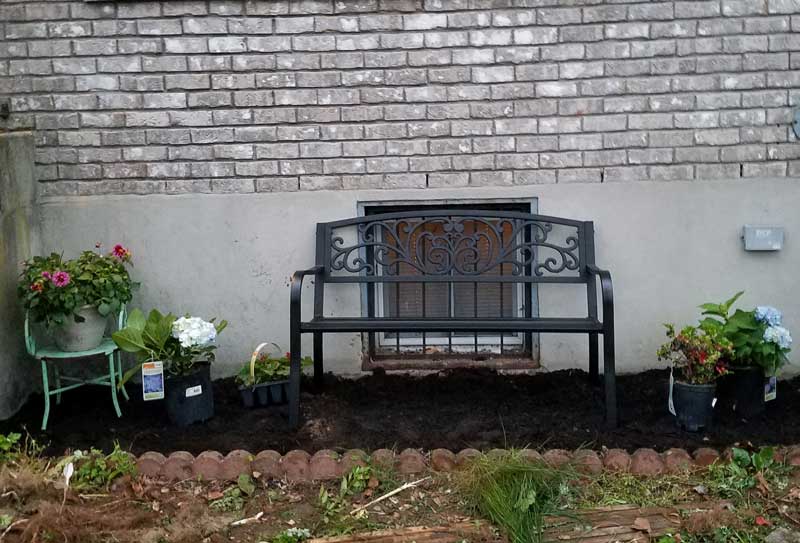
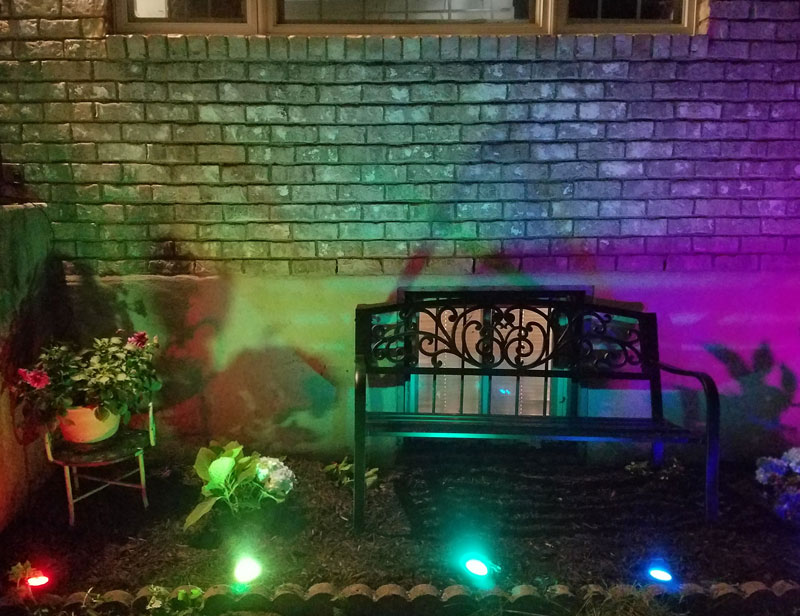
And this is what it looks like now:
A few reasons we opted to go for our small garden makeover before the lawn (and you might too):
- There was a lot of weed dumping to do, and mess to make, and we did not need to worry about ruining freshly planted grass.
- Spring is a great season for planting flowers, while in our area, autumn is better for grass.
- We are working on some larger projects (hello, patio!) in our backyard which we prefer to complete before we can call in the gardener to plant us a lawn in the front AND back.
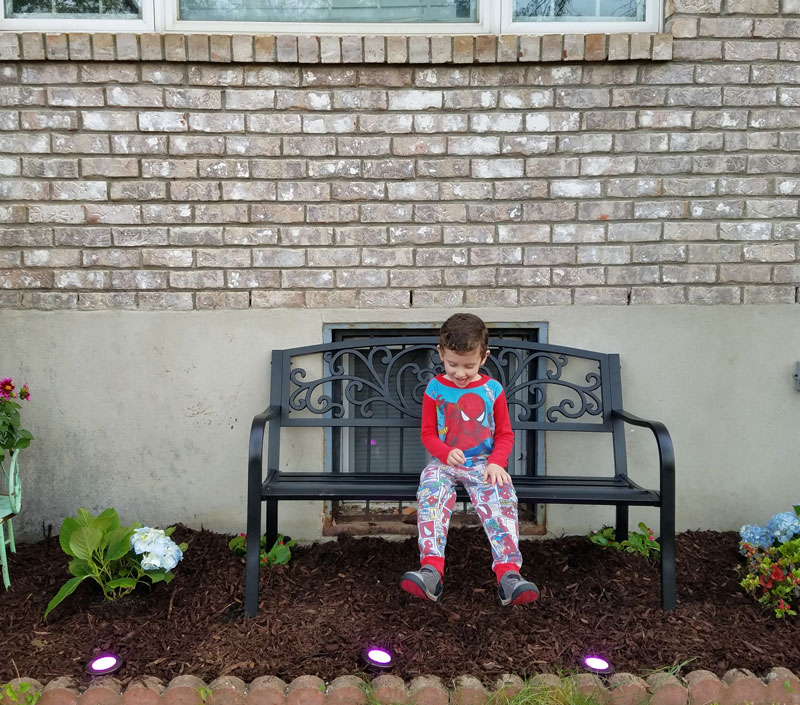
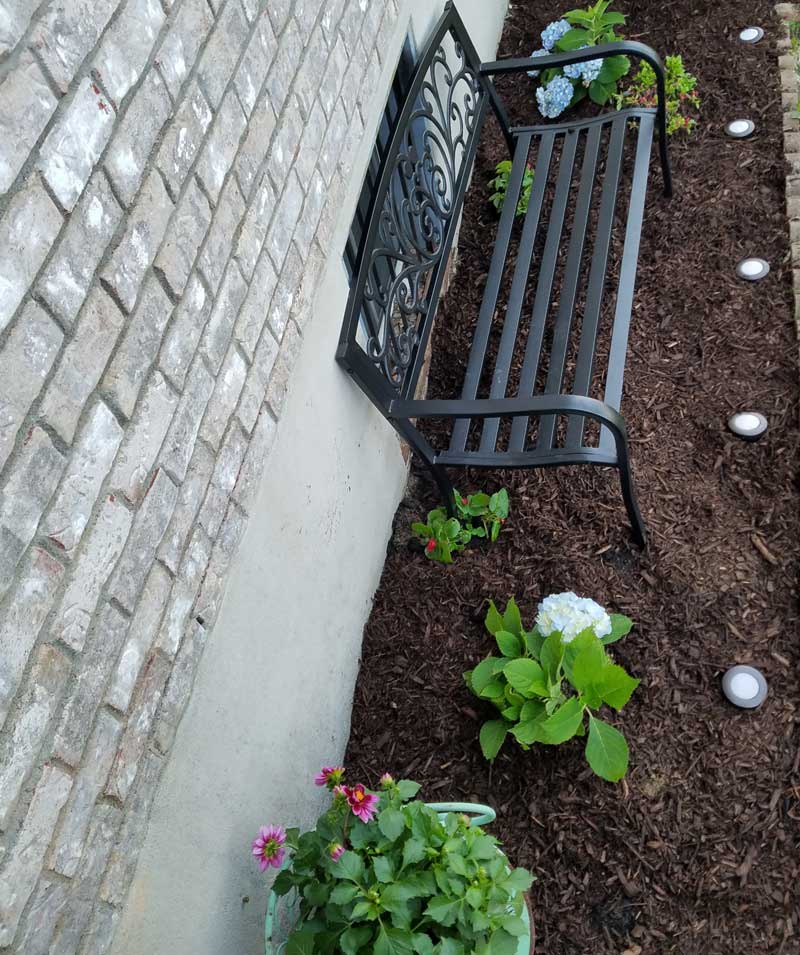
If you’re a city dweller, you get what it’s like not to have a lot of space. Our front porch is tiny, and I wanted a little area to sit outside to watch the kids play once our grass is strong enough.
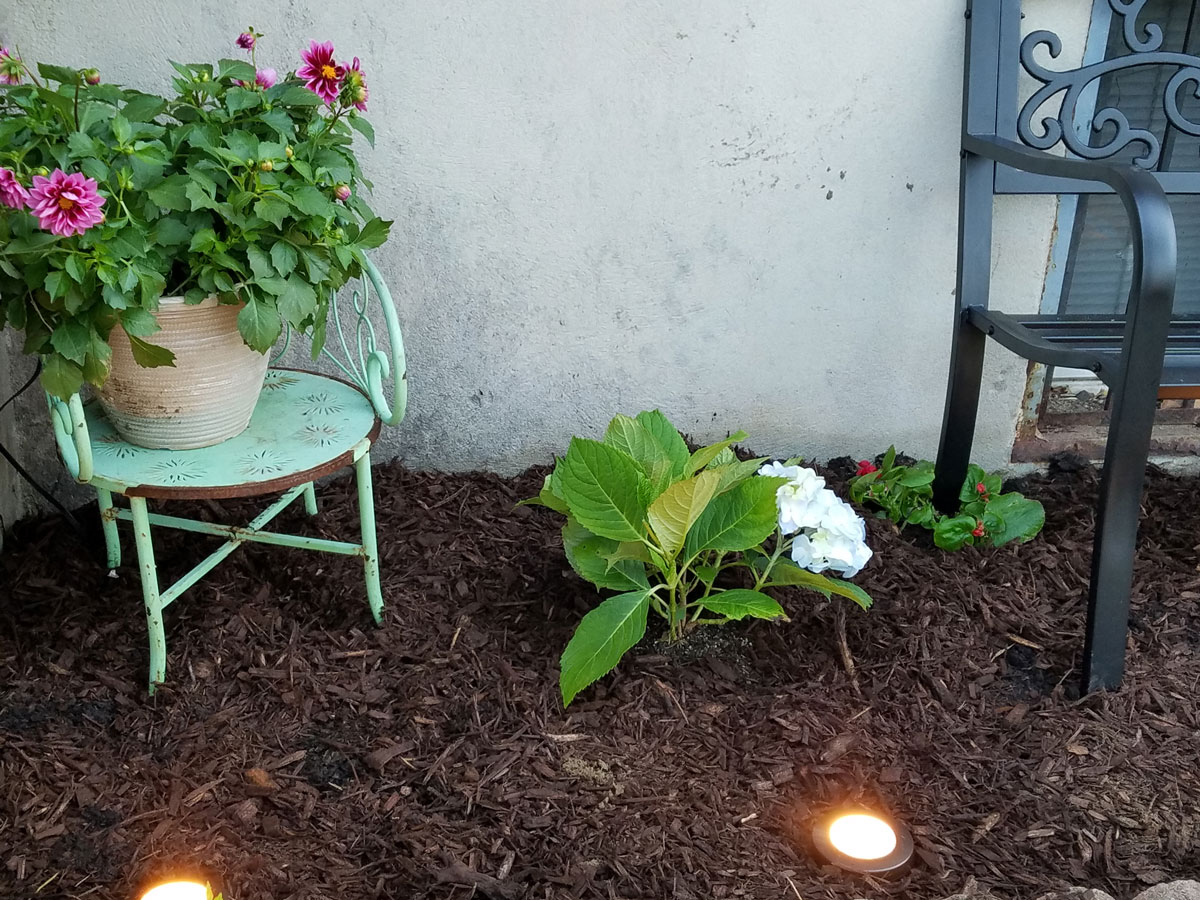
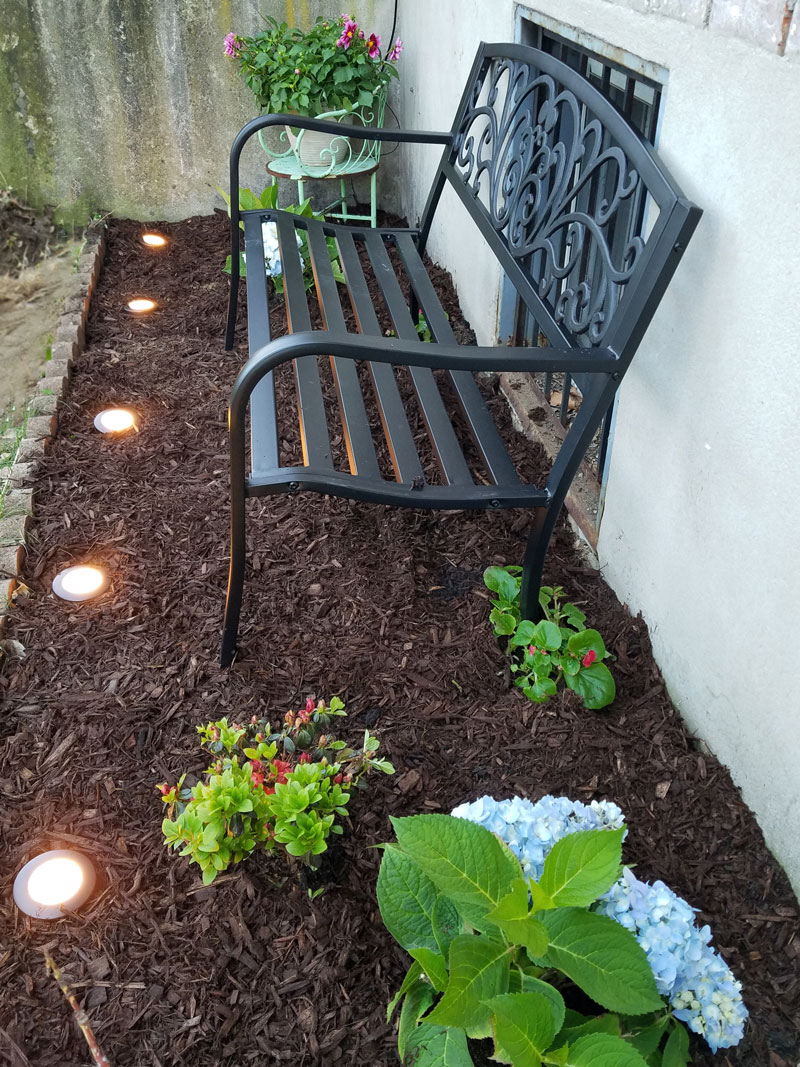
As I was completing my small garden makeover, neighbors passed by and the compliments poured in. They loved the bench, they adored the annuals planted at the back legs and the flower pot sitting on a vintage kids’ bistro chair, but their favorite part?
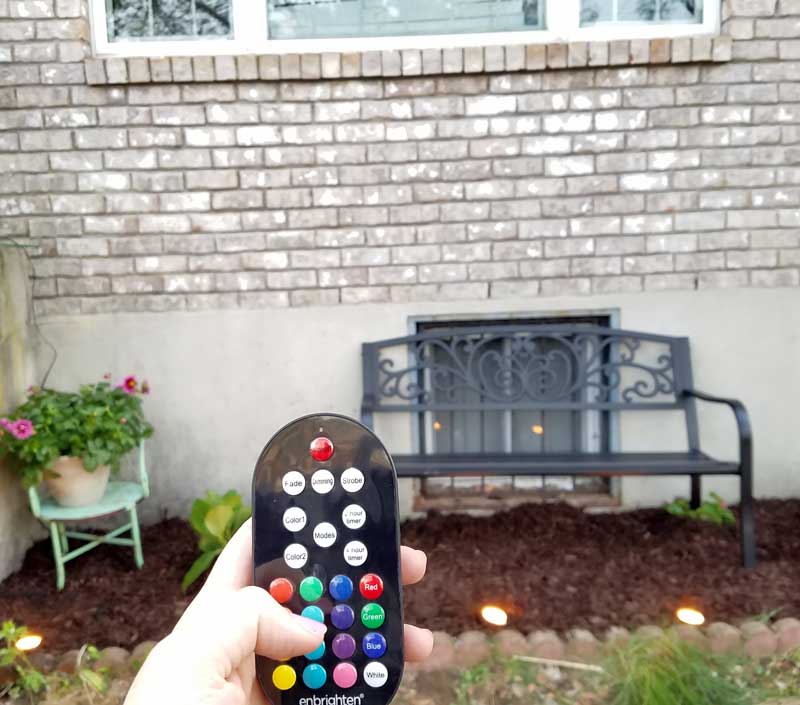
The beautiful Jasco Enbrighten LED Color-Changing Landscape Lights.
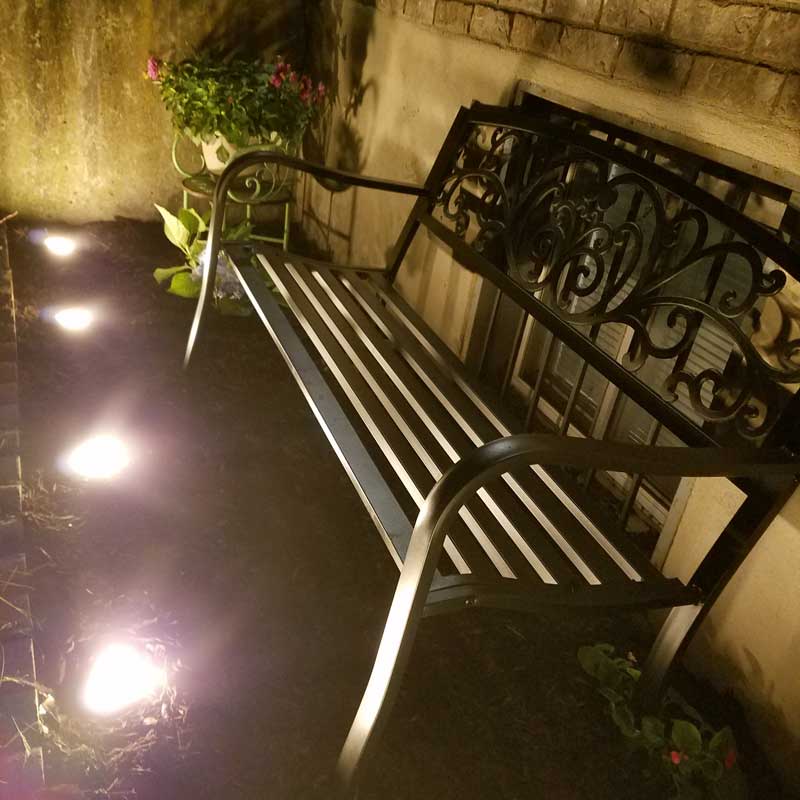
The new Jasco Enbrighten LED Color Changing Landscape Lights are the crowning glory of our small garden makeover – both because of the functionality they offer (lighting up our garden bench at night), and the form factor.
The oil-rubbed bronze is both beautiful during the day, and durable all year round. An easy-to-use remote changes between three white light options, sixteen single color options, as well as over 120 custom color combinations and preset color modes for holidays and year-round.
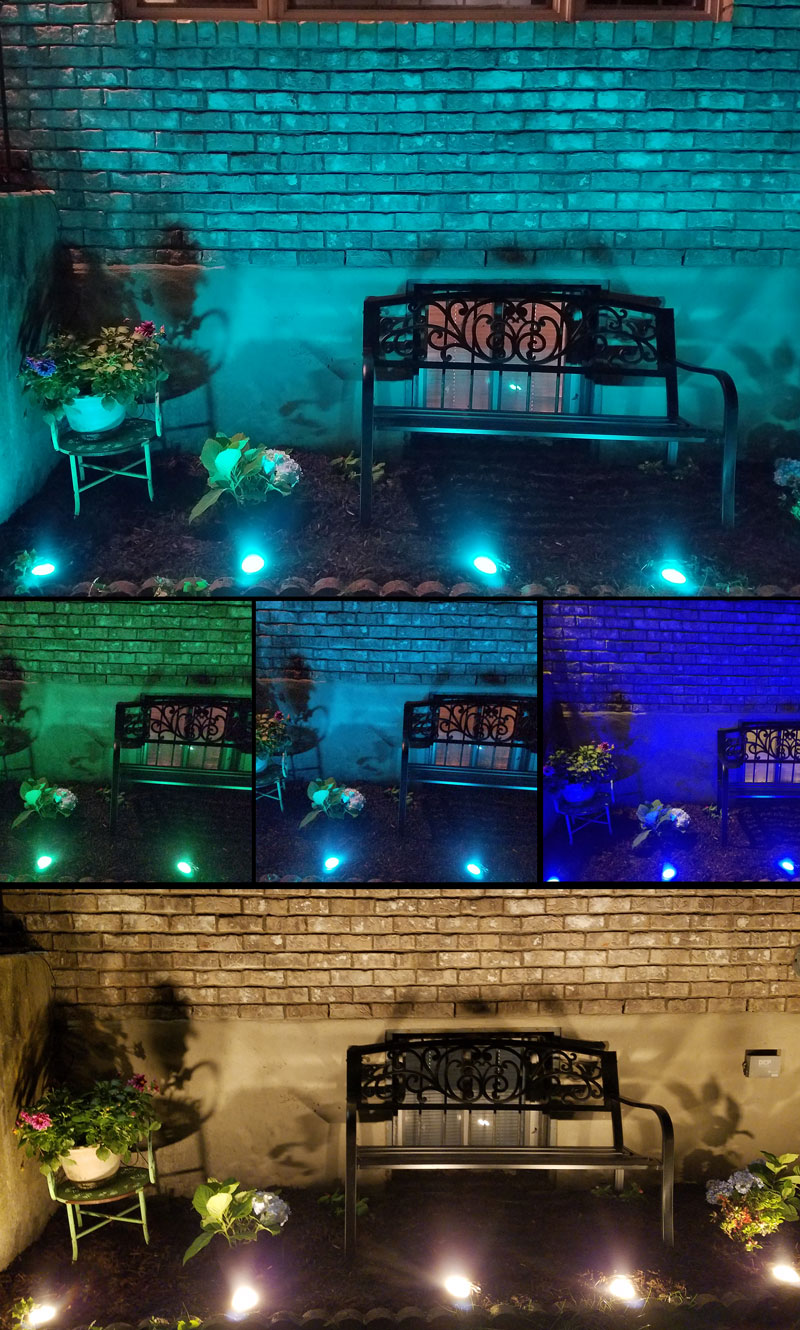
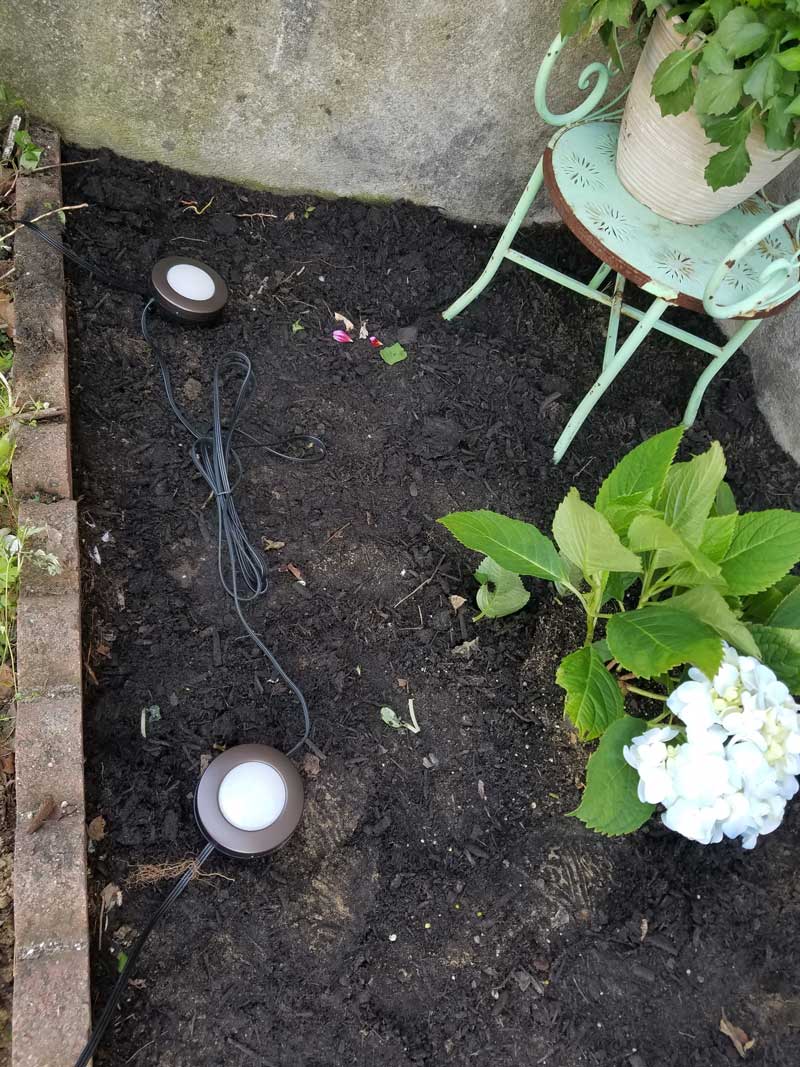
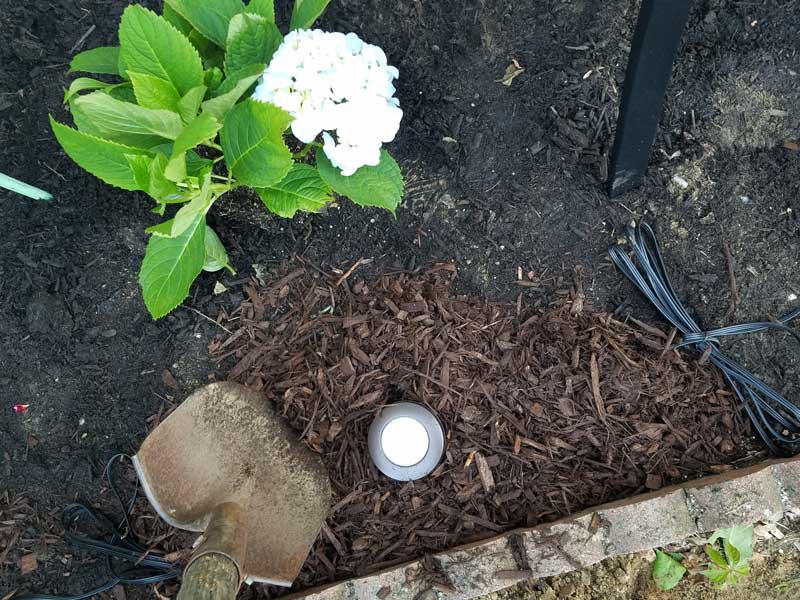
The cord is burial grade so we covered that over in mulch. You have 3 mounting options: you can mount the lights overhead, place the lights on the ground, or use the included stakes to “plant” them in the soil. We used the stakes.
We are so proud of our small garden makeover and can’t wait to share with you how we did it! Come fall, we plan to plant our lawn, and include some stepping stones leading to the bench area. When the lawn is strong enough, the kids will be able to play there and I can watch while I type out my next blog post.
Step by Step: How we completed our small garden makeover with some tips for you to try it yourself:
Watch the video below to see our process and to watch the lights in action. Or scroll down for step-by-step photos and instructions.
https://www.facebook.com/MenuchaDesign/videos/1701897366525129/
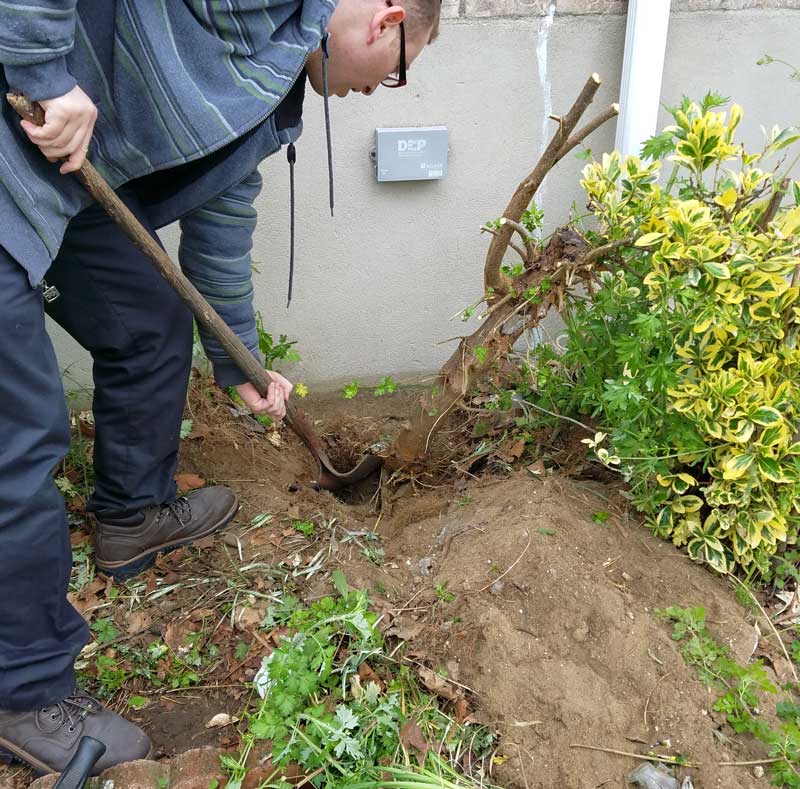
STEP 1 – CLEAN IT UP:
As you may have noticed in our before picture, our garden area was completely overgrown. Whatever better soil was laid down there before created fertile ground for loads of weeds and invasive shrubs, or “tree weeds” as we called them.
Armed with a whole slew of tools, my husband first trimmed it, then dug around it, chopped and pulled until he got up as many of those roots as possible.
We then raked away what we could of the remaining debris.
If you don’t already have a border for your garden, you may want to add that now. We already had a decorative brick border, so we skipped that step.
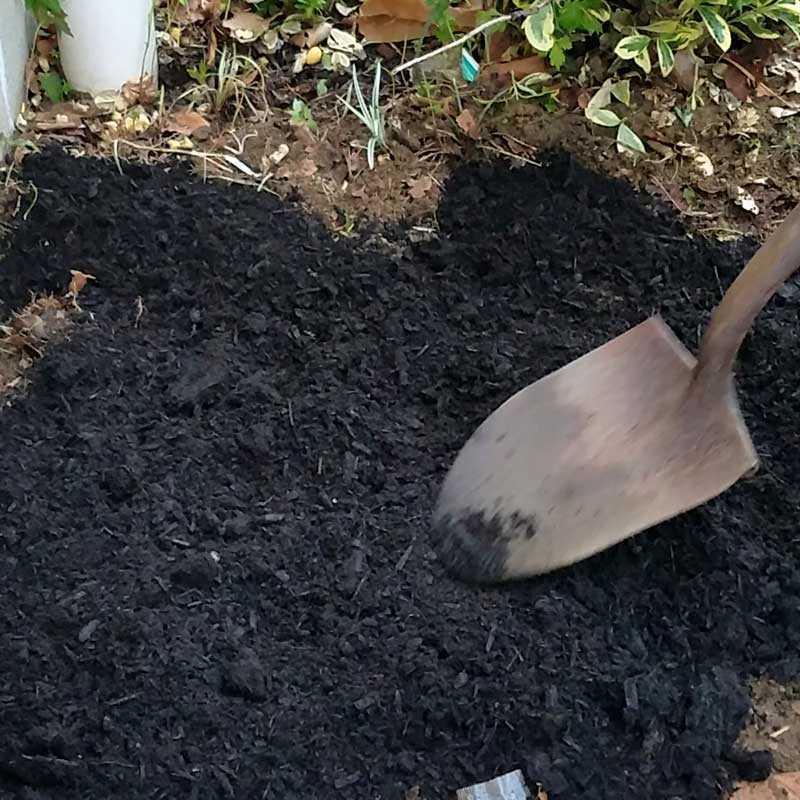
STEP 2 – TOPSOIL:
It may seem backwards to add topsoil before the plants were put in, but I wanted to to be spread evenly including under the bench. If I’d repeat I may put it down just around the plants (even though I wanted the soil to be good throughout for future plants too…)
STEP 3 – PLAN YOUR LAYOUT:
It makes sense to first place your focal point – in my case the bench – and then to build out around it. I wanted something a bit more scattered and asymmetrical, but I did purchase two matching hydrangea bushes to balance things out. With the bench grounding the center, and the hydrangeas balancing things out more, I was set to add a bit of quirkiness to my small garden makeover.
Make sure to get plants appropriate for the sunlight that your garden will receive. I also recommend setting the stage with perennial plants and filling in with annuals. I chose the hydrangeas which are perennial , another azalea shrub which I hope will grow big and pretty, potted Dahlias which might not last out winter in our area, but it’s in a pot so that works for us. Annual begonias make great filler to add a spot of color.
Consider a plant stand of sorts (like the adorable vintage chair we put) to add some character.
STEP 4 – PLANT YOUR PLANTS:
Plant each plant as you laid it out according to package instructions. Since I had already laid out topsoil, I first raked away that layer of soil, and then dug a hole, placing the sand that I removed away from my garden.

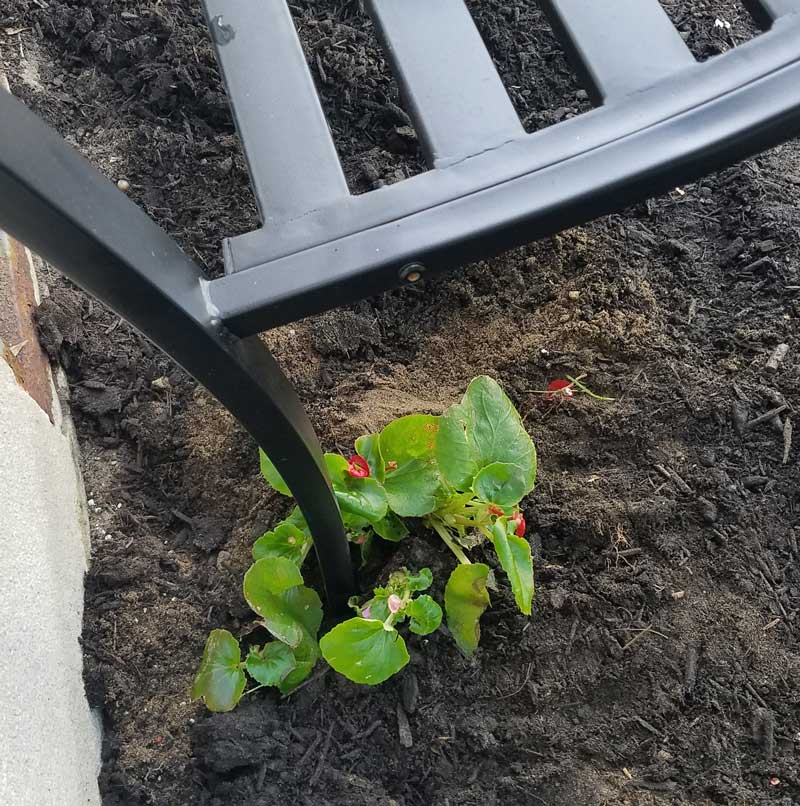
I decided to get creative with the annuals and planted them around the back legs of the bench as if the bench grew from the flowers.
STEP 5 – INSTALL YOUR LIGHTS:
Follow package instructions to install your Jasco Enbrighten LED Color Changing Landscape Lights! First plan how you want to lay out your lights. Next, mount the controller. Install your lights by placing them where you want them or by digging them into the ground with the included stakes.
STEP 6 – MULCH:
Add a finishing touch with mulch (we matched ours to our neighbors’ which we had partially covered with sand while digging – whoops!)
The cable is burial grade so hide those wires!!
STEP6 – PLUG IT IN AND HAVE FUN:
Once your wires are installed, you can plug it into your outlet. Use the included remote control to play with the lights and enjoy the beautiful effects!
Have you ever completed a small garden makeover? Which garden solutions are you looking for – do you have any questions about our project? Comment below!


This is a great makeover. It seems so relaxing. Enjoy!!
Thank you Tonna, in the couple of weeks since we’ve done it, we’re really enjoying it!
It’s so beautiful! I love what you did with the chair. I cam’t type what it really is because 1 of my keys ism’t working & I’ll bet you ca guess which 1 it is.Your hubby did a really good job! I love it!
Thank you Gail! That’s my favorite part too. I was so impressed with how my husband got rid of those crazy shrubs! And is it by any chance the letter N? 😉
Awesome!It is like in fairy tales!
Thankyou, Gianina! I was going for that whimsical look!
Thanks for sharing this precious information with us, this really helpful for me.