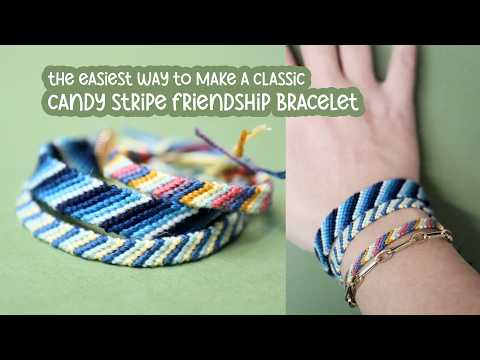
Foundations: Candy Stripe Friendship Bracelet Pattern – Step by Step Tutorial
Learn how to make a fun and colorful candy stripe friendship bracelet – perfect for beginners! This easy tutorial is a great bracelet to follow up with the zigzag friendship bracelet pattern. This post contains affiliate links.

If you want a friendship bracelet that looks bright, neat, and a little bit magical, the candy stripe pattern is the one I always come back to. It’s the classic diagonal stripe, the one that looks great in school colors, summer brights, or soft pastels, and it’s honestly so satisfying once you see those stripes stack up.
I love this pattern because it’s so brainless and calming to make. You get into a rhythm, your hands stay busy, and the bracelet starts to look “real” pretty fast. Plus, it’s beginner-friendly, so it’s a sweet win if you’re helping a kid learn. In fact, I consider it to be one of the foundational friendship bracelets for beginners, alongside the spiral (Chinese Staircase) friendship bracelet.
In this guide, you’ll get simple options for colors, sizing tips that actually help, and clear instructions to carry you through, from your first knot to your final tie. Keep it relaxed, your first one doesn’t need to be perfect, it just needs to be yours.
Since the goal of this post is to teach you everything you need to know about making and designing the candy stripe friendship bracelet, it got a big long. So I decided to include a table of contents so that you can find your answers quicker.


What a Candy Stripe Friendship Bracelet Is (and Why It’s So Popular)
What is the candy stripe pattern?
The Candy Stripe friendship bracelet pattern is very simple: form diagonal stripes by repeating the same knot direction across the row. You’re knotting stripes – the diagonal line forms naturally, as you knot and the level of the knots go down.
With the candy stripe friendship bracelet, you get a clean, bold look even with simple color choices. It’s really hard to get wrong. It works in 2 colors, rainbow, or ombré color schemes. It’s easier than similar bracelets, like the flip flop friendship bracelet.
Why people love it
The candy stripe friendship bracelet pattern is arguably one of the most common ones for a few reasons:
- The pattern is easy to memorize – once you get the hang of one line, you don’t need to refer to the instructions anymore.
- It’s easy to personalize and “theme” by choosing colors that work for a particular subject.
- Progress is quick, satisfaction comes almost immediately as the stripes form.
- They come together quite quickly, making them great for gifting, swapping, and summer camp or classroom projects.


Quick Pattern Snapshot (For Busy Readers)
Here’s a quick overview of the pattern that’s skimmable:
- Skill level: Beginner
- Time: About 30 to 90 minutes (depends on length and how fast you knot)
- Best string: Embroidery floss
- Common setup: 6 to 12 strands
- Core idea: Forward knot across each row to form the diagonal stripe
Material Choices for the Candy Stripe Friendship Bracelet
Did you know that there are different strings you can use to create friendship bracelets? Here’s a quick overview of the best ones for this candy stripe friendship bracelet.
Embroidery floss
This is my go-to for most friendship bracelets. It comes in so many colors, has a delicate look when knotted, and comes in large affordable variety pack. It’s the correct scale for a bracelet like this. The friction is good and the knots hold well.
Standard embroidery floss is definitely what I’d recommend when doing the candy stripe friendship bracelet pattern with beginners.
Other string options
You don’t have to stick to embroidery floss! Whether you’re looking to upgrade, availability is an issue, or you’re just wanting a change, here are some other options:
- Pearl cotton size 8- this finer embroidery floss gives a much thinner, realer, upgraded look. It’ll be harder to work with and produce smaller results for the same effort, but is a great option for a bracelet that looks more like real jewelry.
- Crochet thread – This is also quite fine, but tends to be cheaper. Get these in big spools in more limited colors rather than big mixed package sizes.
- Nylon cord – This satin-effect cord looks playful on bracelets. It won’t hold its knot as well, so pull tight and glue the finishing knots shut.
Tools that make it easier
While all you really need for friendship bracelet making is the floss you’ll be using and any pair of scissors you have handy, these tools can make things go more smoothly:
- Good fabric-dedicated thread snippers will give you a cleaner cut (with less fraying) than ordinary scissors that are also used for paper.
- Tape, binder clip, safety pin, or clipboard – Bracelet makers come in two types: “secure your bracelet” knotters and “knot in your hand” knotters. I’m the second type. But if you prefer to have your bracelet secured while knotting, use a safety pin to pin it to your pants/skirt, a clipboard, tape on a desk, or a binder clip and folder.
- Measuring tape or a ruler – of course, to get accurate measurements, you’ll want measuring tools.
Optional extras
- Beads – I’ve shared more beaded friendship bracelets in the past, but if you want a little glam in this bracelet too, adding beads is a great way to do it.
- Glue – I like to glue my final knots. It just makes things more secure, protecting my hard work.
- Clasps – I love to add clasps to my friendship bracelets – it really upgrades the bracelet, and helps it last longer by making it easily removable.
Tips for designing and planning your candy stripe friendship bracelet
When you have a friendship bracelet as simple as the candy stripe friendship bracelet pattern, you know that your design choices and plans will make the whole impact.
Choosing Colors That Look Good in Candy Stripe
Color choice will be your biggest deciding factor for how this looks.
Easy color formulas
Here are some basic color approaches I take when choosing colors for the candy stripe friendship bracelet pattern.
- 2-color bold stripe – this high contrast effect chooses two colors with contrast to repeat through the whole design.
- 3-color balanced stripe – a classic and playful approach to color choice with more transition between shades.
- Rainbow stripe – Choose ROYGBIV colors in any shade for a more child-friendly and playful look.
- Monochrome stripe – One of my favorite approaches with any bracelet is to use the same color family in different shades for a gorgeous ombre.
- Themed scheme – Since the bracelet is so simple, choose different colors to fit a theme. Think: yellow, white, and green for a daisy vibe, red, green, and gold for Christmas, school or team colors…
Pastels are great for Spring, brights for Sumer , deep shades for fall…
How to order your strands
When choosing the order of your strands, consider the color wheel. I find that it’s simply the harmonious choice – the way the eye is used to seeing and the brain is used to processing colors.
Sizing and Measuring (So It Fits the First Time)
You want it to fit – adding strings to a bracelet can be annoying – but you also don’t want to be wasteful. These tips for sizing and measuring your bracelet will allow you to get it right the first time.
How long to cut each strand
Since each wrist size is different, the general guideline is to start with your “wingspan” – that is, the size when you spread your arms. Take the end of the string with one hand, then, using the other, unspool it until your arms are stretched and the string is taught. Cut it there.
But there are so many variables at play! Someone who is very short but has a wide wrist may want to add a few inches. 45inches is a very safe zone for cutting, allowing space for knots and extras..
Here are some more factors that will affect.
How wide the bracelet will be
More strands equals a wider bracelet. If you’re using a lot of colors, you may want to add a few inches just to be safe. Keep in mind that you’re also using more strands, so you don’t need that much more.
The same strand count using tighter knots equals a slightly narrower look and will use less string.
Planning for ties
I do have a dedicated post on how to start and finish friendship bracelets, but keep in mind that it’ll affect the length of your starting strings too. If you’re using a knotted loop, you’ll need to choose one color to add a good 6-8 inches to.


What you need to know before making this candy stripe friendship bracelet
Let’s walk you through the details of this bracelet beyond materials.
Setting Up Your Strings for Success
How many strands to use
One of the cool things about the candy stripe friendship bracelet is that there are no rules with how many strings you can use!
The general guidelines are:
- 6 strands for a slim bracelet
- 8 to 12 strands for a classic width (you can double strands for fewer colors
Keep in mind that your bracelet will be one knot narrower than your strand count.
If you go too wide, you may start having curling.
How to fold or not fold
So do you double strings and fold them over or do you use one of each?
The general guideline is: Fold in half for a loop start and don’t fold for a tie start. If you fold, you’ll need half the colors of your strand count, so keep that in mind when planning.
How to anchor your work
You don’t need to anchor your bracelet as you work, but if you prefer to, here are some ideas:
- Tape it to a table
- Clip to a clipboard
- Pin to a pillow or jeans (great for travel)
I usually work in my hands, but I do have a clipboard with storage inside in general for friendship bracelet making.


The Only Knots You Need: the forward knot
One of the cool things about this bracelet is that you only need ONE knot – the forward knot. Here are some tips for beginners.
Forward knot basics
A knot is made of two hitches – so it’s really a “double knot” as we’d know it. In a forward knot, you’re knotting the left string around the right string twice in the same direction. The working string travels from one non-working string to the next horizontally. You work one string across each row until you reach the next, and then start again from the left.
Common knot mistakes and quick fixes
- Knots loosening – if your knots aren’t holding, it could be because the string is too slick. You can wet them and tighten again before you put your work down, but otherwise, just make sure you tighten them back before “locking them in” with the next knot.
- Stripe looks bumpy – your rows should come out smooth. If not, it’s probably that you’re using different tension to knot each one. Tension refers to how tightly you knot and is heavily affected by your energy levels and mood. Consider doing each row in a single sitting.
- Holes near the top – the first row can really be wonky. Your strings aren’t straight yet. Don’t worry about that. Do make sure to pull that first row tight, but regardless, that’s not your core bracelet, so leave it be – you’ll figure that out when you gain some more experience.
Mini practice tip
Muscle memory is your fingers literally knowing what to do because they are used to make a certain motion. It’s what I’m now using to touch type this tutorial, it’s how you make your coffee before actually having coffee (because we know that’s NOT your brain doing it).
Muscle memory can be valuable with friendship bracelet making, and a key to keeping your knots in order and your tension even.
If you want your first bracelet to come out fabulous, consider building muscle memory by practicing the knots on some scraps first.
Taking your candy stripe friendship bracelets to the next level
Ready to upgrade your bracelets? Here are some ways to do this.
Candy Stripe Pattern Explained (How the Stripes Form)
Knowing the “science” behind how the knots form patterns was the key component I used to come up with my own designs – including knotted name bracelets, this open-weave ombre chevron, and more.
The core pattern rule
One working string travels across the row, creating the stripe color. The first hitch creates the top of the stitch. The second secures the bottom. These two create a stitch on the front of the bracelet. Moving along from left to right, you’re knotting (two hitches) around each string, creating a single stitch on the front of each vertical string.
What changes row to row
After each row, the working string moves to the far right.
The next row starts again from the left with the new first string. This “resets” it again, making a stitch in the next color on each string.
How to keep your place
One of the cool things about the candy stripe friendship bracelet is how easy it is to keep track. Keep strands flat and in order and you won’t lose your spot.
Pause at the end of each row, then gently comb strings with fingers to avoid knotting and confusing strings.
Variations and Cute Add-Ons
Ready to make this candy stripe friendship bracelet pattern your own? Here are some quick tips for doing that in a beginner-friendly way.
Stripe width changes
Repeat one color more often for thicker stripes. Meaning, you can do two blues in a row, three pinks, and one orange for a sunsetty-vibe.
Use fewer colors for a bolder look when doing this.
Texture options
Try thicker thread for a chunkier bracelet. You can even mix thick with thin threads (carefully as it’ll heavily affect the final result).
Mix matte and shiny floss for subtle contrast. You can consider a metallic blue and a flat blue to be two different colors for a classy “color on color” look.
Personal touches
Adding beads doesn’t mean you have to add beading throughout. You can add a small bead section near the center for a simple, classy look.
Choose a decorative toggle clasp to add some glam. And you can even use fabric paint for a bold finish, such as vertical color blocking.


How to Make a Candy Stripe Friendship Bracelet
As always, here is the step-by-step process for the candy stripe friendship bracelet pattern.
Supplies Needed
- Embroidery floss (6 to 12 strands total, about 36-45 inches each color, 54 inches doubled over on the 6-strand bracelet is perfect.)
- Scissors
- Tape, binder clip, safety pin, or clipboard
- Ruler or measuring tape
- Optional: bead(s), needle for bead threading, clasp set
Watch the Video
Watch the full-length video on YouTube if you prefer to learn that way! Or scroll down for written instructions with photos.
Step by Step Instructions with Photos
1. Cut and organize your strands
Choose your colors and lay them in the exact order you want the stripes to repeat.


2. Anchor the top
Tie an overhand knot, then tape or clip it down so it won’t move, unless you feel comfortable working in your hands.

3. Separate the strings
Fan them out so they don’t overlap, keep them flat.

4. Make forward knots across the first row
Use the leftmost string as the working string. Tie a forward knot onto the next string. You’re tying left-to-right twice around the same string.


5. Finish the row and reset
Knot the rest of the row, using the working string to make a forward knot around each string. After you knot across, the working string ends on the far right.
Slide knots up gently to keep the row tight and clean (if needed).

6. Start the next row with the new leftmost string
Your new leftmost string becomes the new working string. Repeat the same forward knots across the row again. Keep your tension even so the edges stay straight and your bracelet looks neat.


7. Continue until it fits
Repeat this process, knotting the leftmost string around each string to its right. Check the length around your wrist before you finish.
Stop a little early if you plan on adding any decorative clasps or loop closures.

8. Finish the ends
You can finish so many different ways, but here are a few:
Option A: split your strings into 2 groups and make braided ties.
Option B: Just knot the ends.
Option C: Tie it off and add a ribbon crimp and clasp.

Troubleshooting (Fixes for the Most Common Problems)
Here are some quick fixes in bullet-point format in case you’re still having issues.
- Tension problems
- Too tight (bracelet curls, strings feel stiff)
- Too loose (gaps, uneven edges)
- Fix: adjust tightening motion, keep knots snug but not yanked
- Edge problems
- Wavy sides
- Fix: keep the outer strings straight before each knot
- Twisting and curling
- Why it happens (normal spiral effect plus tension)
- Fix: flatten as you go, keep tension even, blocking post-crafting
- Why it happens (normal spiral effect plus tension)
- Wrong stripe order
- Cause: strand order changed mid-project
- Fix: stop and re-sort strands before continuing
- String issues
- Fraying floss
- Fix: cut a fresh end, avoid over-twisting, knot with smooth motion
FAQs
- How many strings do you need for a candy stripe friendship bracelet?
- Anywhere between 4-12+ works great, with 8-10 being the sweet spot.
- How long should I cut embroidery floss for a candy stripe bracelet?
- “Wingspan” – or from fingertips-to-fingertips when arms are spread is great. Or just cut 45 inches.
- What’s the easiest way to start a candy stripe bracelet, loop start or ties?
- The easiest way to begin is just to knot the ends together, but I do share other ways in this post. My favorite way to start is using a ribbon crimp and clasp.
- Why is my candy stripe bracelet curling or twisting?
- It’s probably a tension issue, combined with the natural effect of repeated forward knots. Try “blocking” it but wetting it when you’re done and securing it flat.
- How do you keep the edges of a friendship bracelet straight?
- By keeping your tension even. It IS best to complete the bracelet in one sitting as tension is affected by things like mood and energy levels, but you can also just be conscious of those affects.
- Can you make a candy stripe bracelet with yarn instead of embroidery floss?
- Yes, but your knots won’t glide as smoothly or be as even. The result will be more childish and less sophisticated. If you need to use yarn for whatever reason, go for a finer yarn if you can, and use fewer colors.
- What knot do you use for the candy stripe friendship bracelet pattern?
- The only knot you need to know is the forward knot.
- How do you change colors in a candy stripe bracelet?
- The color change comes naturally by arranging different color strings. f
- How long does it take to make a candy stripe friendship bracelet?
- Depending on how many colors you’re using, your experience level, and other factors, it can take as quick as half an hour or as long as an hour and a half – or longer.
- What’s the difference between candy stripe and chevron bracelets?
- Candy stripe bracelets has you knotting from left to right to form a single diagonal. Chevron has you knotting from right to left and left to right to meet in the center and form a V-shape.
Conclusion
Congrats! You’ve officially learned how to make a candy stripe friendship bracelet – and even how to adapt it and make it your own. I hope you’ve found this to be truly helpful, and even a replacement for an in-person workshop.
I recommend that you start simple: go for 2-3 colors and 6 strands, then gradually add more colors and strands. See how wide you can stretch it before deciding on your limits. Craft the basics, then add beads and other embellishments.
Bookmark this post, or print out the steps for when you’re ready to actually start knotting!


